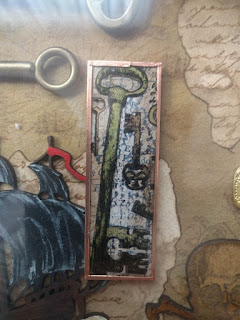
I think that you are all going to love this post, its all about my latest project a Pirate Themed Shadow Box. I had real fun making this and I think that you all will too.
The inspiration for the main element of the shadow box came from a Wanderlust class that I have been taking all about soldering. Some of the other people taking the class had used stamps on the glass prior to adding the paper inserts and the soldering. I wanted to try this and decided to use a key themed stamp that I had had for a long time but not used, and it just kind of grew from there.
Materials
2x Glass Microscope Slides (eBay from the-barmy-box)
3x Replica Spanish Gold Doubloons (eBay from marge-liu)
Art Van Go Walnut Ink Crystals
Poundland Copper Slug Tape
Hobbycraft 15x15cm Deep Frame
Map Paper
2x Old Brass Keys
Calico Craft Parts Skull and Cross Bones (Small), Galleon Boat shape 6 (Medium), Parrot on a branch (Small), Rapscallion Letters (Small) Ix1 Rx3 Ax2 Ex3 Sx1 Ux1, Rapscallion Letters (Medium) Px1 Tx1.
Treasure Gold Gilding Wax
Mod Podge
Ranger Archival Brown Ink Pad
Stazon Black Ink Pad
Silicone Glue
Tacky Glue
Decoart Acrylic Paint Carbon Black, Titanium Buff, Burnt Umber, Ultramarine Blue, Cobalt Turquoise Hue, Blue Green Light, Primary Cyan, Diarylide Yellow
Decoart White Gesso
Metallic Marker Gold, Copper
Lloyds Glycerine
Tea Dyed Paper
Original Factory Shop Brown Parcel Paper
Clean your microscope slides well on all sides to ensure there are no fingerprints.
Stamp the key image using the stazon ink then gently heat set.
Using the slide as a template, cut out a piece of the map paper to the same size.
Using a dry brush, lightly add a few strokes of the gesso to dampen down a little of the colour and the text from the map.
Add a light daubering of Brown Archival ink around the edge, then use a distressing tool to damage the edges.
Cut your copper tape into 4 equal strips approx 6mm in width.
Assemble your slides, sandwiching the map paper between the two slides. Using the copper tape around the edges, stick the slide sandwich together.
Take your tea dyed page and spritz with the walnut ink crystals dissolved in a little water. Repeat the spritzing a few times until you are happy with the colour, remembering to dry between each layer.
Stamp on your page using the script stamp and the brown archival ink. So that the repeat doesn't look too regular, stamp the second time upside down.
Tear sections of the stamped page to fit in your shadow frame. Using a lighter carefully burn the edges of your pieces to give a real old distressed look.
Cut a piece of faux leather large enough to fit the back plate of your frame.
To make faux leather take a look at this tutorial
Put the drop part of the frame over the faux leather to allow you to position the stamp, then stamp the map and the compass rose using the brown Archival.
Paint the ship and the parrot using the acrylic paints
Gild the larger letters using the gilding wax (you may need a few layers to get good coverage). Paint the smaller letters using the carbon black and then add a touch of gilding to the edges of the letters.
Glue the faux leather down to the frame back plate using the Mod Podge, and once dry glue down your distressed stamped page.
Glue down the slides, keys and doubloons using the silicone glue to give dimension, and glue down the skull and ship using the tacky glue.
Assemble your frame.
Glue down the letters and the parrot to the frame using tacky glue and leave to dry completely.
I hope you have as much fun following along with this tutorial as I did making it.
Any questions or comments please leave them below.
Good Bye Until Next Time.


Ahoy thar Gareth matey!!!
ReplyDeleteAbsolutely wonderful, Gareth, you are a magnificent ambassador for the true spirit of crafting and this blog was an education and an inspiration. Thank you for uploading it.