Friday, 14 April 2017

A Few Previous Works

Good Morning All.

As promised in my last post I will be showing off a selection of some of my previous mixed media works.  There are a few different types of work on show here, some of them are based on designs that I have seen on the Internet and some are based on workshops that I have taken in the past (each of them have my own spin on them though).


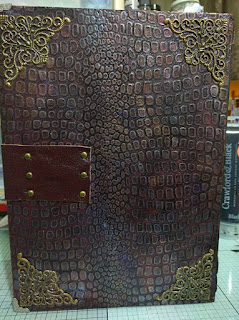
Altered Boxes (Book of Secrets Workshop)


Box 1


Box 2


Altered Books and Boxes (Book Of Ruination Workshop)


Book 1


Book 2


Box 1

Altered Box (Distressed Metal)


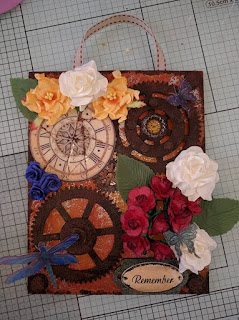
Canvases

Canvas 1

Canvas 2

Canvas 3

Canvas 4 (Reversed Nature Canvas)


Canvas 5 (Reversed Garden Canvas based on https://youtu.be/-q2Fmjtj-kc)


Wall Art

WA 1

WA 2

WA 3

WA 4


I hope you've all enjoyed looking at some of my older works, and that they inspire you to create some masterpieces of your own.

Any comments or questions leave them below.

Good Bye Until Next Time.

Wednesday, 12 April 2017

Art Journal Prompts - Week 15: Vintage

Good Morning All.

This weeks prompt was Vintage.

Although I have done many mixed media pieces in the past most of them have been about the aged distressed look rather than the aged vintage look so this was a slightly new area for me.

I found a nice old fashioned vintage page to use for my background and this gave me an overall colour scheme for my page.  Normally when people think of vintage they tend to go towards browns and sepias and as they are my normal colours I wanted to try something different.  Other than my background I wasn't really sure about how to approach this, so I started of by having a look through my stash of ephemera and looking on Google for vintage photos of people.

As soon as I saw the picture of the family females I knew that it would marry up perfectly with the Family Record ephemera that I had, and things just moved from there.

As this is a fairly simple page again today there aren't any step by step pictures.


Materials
Ranger Archival Ink Pad - Black, Blue
The Works Wooden Swirls
DecoArt Acrylic Paint - Pthalo Turquoise
DecoArt White Gesso
DS Tape
Tacky Glue
Silicone Glue
Vintage Ephemera
Small paper flowers

Cut your background paper to fit your journal page and stick it in.

Dry brush the page with white gesso (if you add too much in one place, use your finger to spread it out).

Cut out your vintage photo and using the ds tape stick it to some parchment coloured paper. 

Rip the parchment paper to create a rough frame around the image, then edge using the blue archival.

Edge your remaining ephemera alternatively using the black and blue archival.

Paint the wooden swirls with two coats of the Pthalo Turquoise and allow to dry.

Layer up your design sticking everything down with the ds tape except the wooden swirls and the flowers.  Glue the swirls down using the tacky glue, and the paper flowers with the silicone glue.

Any questions or comments please leave them below.

In some of my upcoming posts I will be showing you some pictures of some of my past makes so you can see some of the kind of things you can produce.

Good Bye Until Next Time.

Monday, 10 April 2017

Pirate Treasure

Good Morning All.

I think that you are all going to love this post, its all about my latest project a Pirate Themed Shadow Box.  I had real fun making this and I think that you all will too.


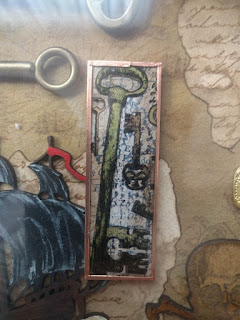
The inspiration for the main element of the shadow box came from a Wanderlust class that I have been taking all about soldering.  Some of the other people taking the class had used stamps on the glass prior to adding the paper inserts and the soldering.  I wanted to try this and decided to use a key themed stamp that I had had for a long time but not used, and it just kind of grew from there.


Materials

2x Glass Microscope Slides (eBay from the-barmy-box)
3x Replica Spanish Gold Doubloons (eBay from marge-liu)
Art Van Go Walnut Ink Crystals
Poundland Copper Slug Tape
Hobbycraft 15x15cm Deep Frame
Map Paper
2x Old Brass Keys
Calico Craft Parts Skull and Cross Bones (Small), Galleon Boat shape 6 (Medium), Parrot on a branch (Small), Rapscallion Letters (Small) Ix1 Rx3 Ax2 Ex3 Sx1 Ux1, Rapscallion Letters (Medium) Px1 Tx1.
Treasure Gold Gilding Wax
Mod Podge
Ranger Archival Brown Ink Pad
Stazon Black Ink Pad
Silicone Glue
Tacky Glue
Decoart Acrylic Paint Carbon Black, Titanium Buff, Burnt Umber, Ultramarine Blue, Cobalt Turquoise Hue, Blue Green Light, Primary Cyan, Diarylide Yellow
Decoart White Gesso
Metallic Marker Gold, Copper
Lloyds Glycerine
Tea Dyed Paper
Original Factory Shop Brown Parcel Paper

Clean your microscope slides well on all sides to ensure there are no fingerprints.


Stamp the key image using the stazon ink then gently heat set.


Colour in the image using the metallic markers being careful not to smudge as you do so (remember to colour on the same side as you have stamped).


Using the slide as a template, cut out a piece of the map paper to the same size.


Using a dry brush, lightly add a few strokes of the gesso to dampen down a little of the colour and the text from the map.


Add a light daubering of Brown Archival ink around the edge, then use a distressing tool to damage the edges.


Cut your copper tape into 4 equal strips approx 6mm in width.


Assemble your slides, sandwiching the map paper between the two slides.  Using the copper tape around the edges, stick the slide sandwich together.


Take your tea dyed page and spritz with the walnut ink crystals dissolved in a little water.  Repeat the spritzing a few times until you are happy with the colour, remembering to dry between each layer.


Stamp on your page using the script stamp and the brown archival ink.  So that the repeat doesn't look too regular, stamp the second time upside down.


Tear sections of the stamped page to fit in your shadow frame.  Using a lighter carefully burn the edges of your pieces to give a real old distressed look.


Cut a piece of faux leather large enough to fit the back plate of your frame.

To make faux leather take a look at this tutorial


Put the drop part of the frame over the faux leather to allow you to position the stamp, then stamp the map and the compass rose using the brown Archival.


Paint the ship and the parrot using the acrylic paints


Gild the larger letters using the gilding wax (you may need a few layers to get good coverage).  Paint the smaller letters using the carbon black and then add a touch of gilding to the edges of the letters.

Glue the faux leather down to the frame back plate using the Mod Podge, and once dry glue down your distressed stamped page.


Glue down the slides, keys and doubloons using the silicone glue to give dimension, and glue down the skull and ship using the tacky glue.

Assemble your frame.


Glue down the letters and the parrot to the frame using tacky glue and leave to dry completely.

I hope you have as much fun following along with this tutorial as I did making it.

Any questions or comments please leave them below.

Good Bye Until Next Time.

Saturday, 8 April 2017

Art Journal Prompt - Week 14: Eastern Promise

Good Afternoon All.

This is going to be a relatively short post today as I don't have lots of in progress shots of the page so I am just going to talk through what I did.

This weeks prompt was Eastern Promise.  As soon as I saw that this was the prompt I immediately knew that there was a certain stamp set that I had to use to make the page.  It's one that I have had for ages but I think that it really covers the prompt well.  The stamp set contains a bridge over a river with some trees, which has a very traditional chinese feel to it.

Now the quote that I used for this particular piece I didn't find until after I had finished the majority of the page.  Nothing had come to me initially so while I was pondering how I could finish the page I took to Google.

The final quote I used was:


Life Is Really Simple But We Insist On Making It Complicated - Confucius


Materials:
Watercolour paper
Copper Miri
Chinese 12x12 scrapbook paper
Alcohol Markers
Surgical Spirit
Memento Black Ink Pad
Paper Flowers
DS Tape
Tacky Glue

I stamped the image onto the watercolour paper using the Memento ink as I knew that I wanted to use the markers and the surgical spirit to create a washy/dreamy look to the image.

Colour in the image using the alcohol markers and the surgical spirit (I filled an old waterbrush with the spirit to make it easier)

Tear the edges of the watercolour paper to a rough rectangle that is only slightly bigger that the stamped image, then mount on copper miri board using the DS tape.

Cut the 12x12 sheet to fit your journal page, then stick down your mounted image to the upper right of the page.

Cut a small 3x3" square from some tea stained paper and write your quote in it.

Mount the tea stained paper onto another piece of copper miri and stick in the middle left of the page.

Using a gold marker inscribe chinese characters along the bottom edge of your page to add interest.

Glue down the paper flowers in any of the open spaces including between the quote and the stamped image.

Any questions or comments please leave them below.

Good Bye Until Next Time

Monday, 27 March 2017

Art Journal Prompt - Week 13: Use Your Scraps

Good Morning All.

This week's prompt was to Use Your Scraps.

I'm sure that if you are anything like me, or like any crafter at all you will have plenty of scraps in your craft studios.  This could be anything from small bits of paper through to bits of materials and boxes.  Each of these things can be combined to create some truly amazing works of art if only we go back to them.  I have found that most people tend to only go back to their scraps if they need a small bit of something to finish a project, rather than using the scraps to create the object in the first place.  I must admit that I am guilty of this on times too, so this prompt was the perfect opportunity to get all those scraps out and create something cool.

As this week's prompt is an action rather than a word I haven't looked for any specific quote to work to, rather I just gathered my materials and used what spoke to me.


Materials
Paper scraps from my stash
Paper Flowers
Old corrugated card box
Ranger Distress Ink Pad - Vintage Photo
Ranger Archival Ink Pad - Brown
Ranger Distress Spray - Tarnished Brass, Antiqued Bronze
Creabox Acrylic Spray - Green
Decoart Mister - Yellow Green
IndigoBlu Script Stamp
Prima Art Basics Heavy White Gesso
Pencil
Black Pen
White Gel Pen
Tacky Glue


Have a look through your scrap stash to try and find an image(s) that can be used for your focal point.  I have picked some butterflies to use as my focal point.  Using these images look for other similar colours in your stash to try and match up.


Once you have all of your scraps gathered, add some heavy gesso to your page to give it some stability and allow any mediums used later to move around.

Tear your scraps and arrange them on your page until you have something that is pleasing to your eye.  This part is going to look different depending on what scraps you have and the sizes available to you.


Once you are happy with your torn shapes, edge them all using a combination of the vintage photo and the archival inks.


Take a side or flap from your box and tear around the edges until you get a piece which will fit on your page.  Make sure that as you tear around the edges, you tear back the top layer to reveal the corrugations underneath.


Ink around the edges and over the surface of the card again using a combination of the vintage photo and the archival inks.


As we are wanting this card to have the appearance of tree bark, add some sprays of the various green sprays, trying not to be too heavy handed as we don't want to completely cover the card.  Add a light spray of the tarnished bronze, then bring the antiqued brass nozzle close to the card before spraying.  This will create a pool of the spray on the surface; whilst this is still wet, dab it with some kitchen paper to spread it around and create a textured effect.


Glue everything down to your page except the butterflies.


Carefully fussy cut out your butterflies, don't worry about the antennae as they can be added back in later using a pen, then stick them down to your page.


Add some detailing around the page using a black pen to add some interest and encapsulate everything.  Using the script stamp and the archival add some stamping in the blank areas if the background.


Add some white dot detailing to the butterflies to bring them to life; and glue some paper flowers down to the page to add a little brightness.  Using the pencil add a little shading around the edge of the corrugated card centerpiece.

Any comments or questions, please leave them below.

Good Bye Until Next Time